Saturday, August 15, 2015

3D Pumpkin Kit For Halloween Pocket Letters


 I'm excited to share with you all what I include in my Build 3D Pumpkin Kit for my Halloween Pocket Letter, and how to put the pumpkins together. This is a great way to make your Halloween Pocket Letters more interactive. The photo above is the card I made for front of the kit pocket.


This is what you will find in my Build A 3D Pumpkin Kits*:
(And what you can include in yours)
12- Pre-cut, Strips are 1/2in. X 3in, punched with a small hole on each end.
2- Pre-cut, 1in. leaves punched with a small hole. (cut leaves with die-cut machine or punch)
4- Brads(2 will be holding the pre-cut stips together)
10-12in. of twine or ribbon
I've also included a QR to scan and direct my PL Pal to find my blog and also my blog address so they can find this post on how to make their pumpkins.

*Believe it or not this all fits in one 3 1/2in. X 2 1/2in. pockets.


NOW LETS BUILD 3D A PUMPKIN 

1. Make sure your brad is on the wrong side of the strips. The side you want to show on the out side should have the back of the brad. If you put it the other way it may not sit flat. I've already done this on my kits because it's a bit confusing to explain. 

2. Spread out all the strips. Lay it out so that all you can see is the back side of the strips and the top of that first brad. 

3. Add a brad to the leaf, then pull up opposite strips and add them to the brad like in the photo below. Complete this until you have all 6 strips on the brad and then close the brad.   

4. Press gently on the top to get a great pumpkin shape. 

5. You should have something similar to this, add ribbon or twine on the top for a nice finished touch.

These are so fun and super easy to make. You can make them bigger and stuff them with candy for trick or treaters. This is great kid friendly craft too. I hope you enjoyed this idea for your Halloween  Pocket Letters. If you are visiting my blog because you received a pocket letter from me with this kit, I hope you enjoyed your Pocket Letter and making your pumpkins. 

THANKS FOR STOPPING BY!!! 
-Chris

Friday, August 14, 2015

Many Thanks Bags- Brutus|Monroe DT Post


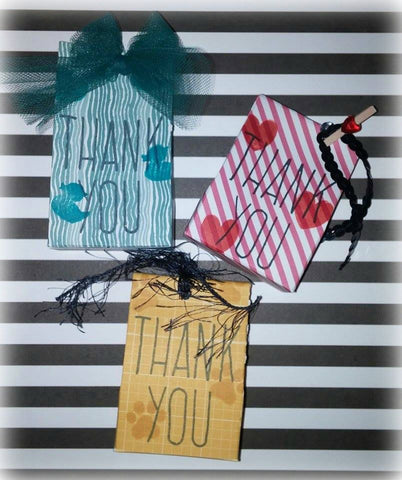
Happy Friday!!! I'm dropping in to share a few cute bags I made using  the Many Thanks Stamps sets.  Many Thanks was the first Brutus|Monroe Set I used and I loved it because you can say "Thank You" for just about anything with this set. I wanted to show you that you don't have to use this set just for cards.

What you will need:
  • Brutus|Monroe Stamps Set-Many Thanks                                                                        
  • Brutus|Monroe-Premium Chalk Inks                                                                                         
  • Cardstock cut to 41/2in. X 6 1/2in                                                                                                      
  • Scoreboard                                                                                                                                                 
  • Adhesive Tape                                                                                                                                          
  • Scissors 

First you will need to score your 4 1/2in. X 6 1/2in. piece of cardstock 5 times. On the 6 1/2 in. side score at 2in. , 3in, 5in, and 6in.  Turn to the 4 1/2 in side and score at 1in.  Once you have it scored you are going to cut out the little rectangle on the corner(see photo). Cut along the score line to the 1in. line, make sure you don't go any further than the 1in. line.
Fold along all the score lines. Fold over each side and find the side you would like to be the front of your bag. Grab your favorite icon from the set, your favorite Brutus|Monroe Premium Chalk Ink. I like to use a color that is similar to the paper. Fold over the sides, so that just the front is showing and stamp the image randomly. You can also use washi or masking tape to mask off the front, this is just easier and faster.
          
To add the Thank You without the circle use masking tape to cover what you don't want to ink. On this sized bag the Thank You fits perfectly.   Now to put the bag together, run your favorite adhesive tape along the tab above the cut out rectangle.  Fold over to the other side and pres firmly making sure the edges all line up.
                    
All you have left to is fold in the bottom tabs and adhere them closed. There are lots of ways to close these bags at the top. You can use ribbon, tulle, clips, staples, anything really or you can leave them open.  You can't fit a lot in these bags, but its a great way to say Thank You with a little treat.

Thanks for stopping by and  have a great weekend.  -Chris 

Wednesday, August 5, 2015

OITNB Pocket Letter & ID Badge

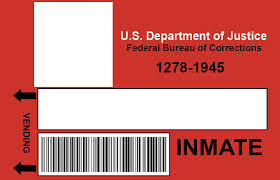
I recently did an Orange Is the New Black themed Pocket Letter swap with my Facebook BFF Jennifer Laging. I had so much fun creating all the cards and adding the extra goodies. I used my Cricut Explore to create the ID badge and I knew everyone would want to know how it was done. It was very easy to do.  Keep reading to see how....


Upload the above image into Cricut Design Space, with a square photo of your favorite inmate. Make sure you do a Basic Upload, and click complex image. Insert both images into a new project. Resize the square photo of your inmate to fit in the square on the badge. Then using a simple font add your inmates name. If you want it like the show, do it like I did Jen's.  Once you have everything sized and in it's spot select everything and click Attach. I always check to make sure everything is going to Print Then Cut and not just Cut, to check this there will be a printer icon next to your images and text.  Once you've got everything ready to go you can size it to fit in a Pocket Letter, or how fun would these be for a OITNB Viewing Party. If you need more instruction or help please feel free to let me know via FB or in the comments. 


   Jennifer told me she loved all the inmates but her favs are Red and Crazy Eyes, which is why I used them on the front. I know you can't see it but on the back Crazy Eyes Pocket I put a I'd Throw my Pie For You sign, and filled the pocket with die cute dandelions and chocolate and vanilla swirl die cuts.  In the Red pocket I added her Chicken Quote and a bunch of die cute orange chickens. Yes! I did buy Top Ramen, just to steal the flavor packets lol... They fit and tied in so well with the theme. The other goodies don't really tie in with the theme I just used them to stay with the color scheme and send Jen some other crafty goodies.

Thanks for stopping by my blog please click Follow and Leave a Comment...  -Chris


FUN LINKS!!!!

What is a Pocket Letter? How it got started:
 https://www.youtube.com/watch?v=OxHLkm0lZi0

OITNB- Opening Credits-You've Got Time
https://youtu.be/fBITGyJynfA

OITNB- Red's Chicken Quote
https://youtu.be/LNwDcr2qP4M


Tuesday, August 4, 2015

Baby Bumps Shoe~OAK Tree Stamps

Created For OAK Tree Stamps- Design Team


I'm excited to share my first project for OAK Tree Stamps. I really wanted to make a card but figured why not try a Baby Shower party favor. The Baby Bumps Set had my head filled with thousands of ideas. 

How I Created The Shoe:

1.  I made the shoe with a file from SVGcuts.com's set Bundle Of Joy, cut with my Cricut Explore. It's only four pieces and goes together very easily. I added a button brad to the top strap, for a nice finished touch. 

2.  After stamping the baby from the Baby Bumps Set, onto  Stampin' Up!-Whisper White Cardstock,  I colored her in with 3 Spectrum Noir Markers( See photo or Supply list for colors). 
If you lay on several layers you get different colors from one marker, Oak Tree Offers a great coordinating SVG file for all their stamps.  I didn't use it I fussy cut my image because I need it a bit smaller.  


3. Using Foam Tape I adhered the baby and Welcome! flag on the top of the shoe. 

4.  To finish it all of, I used leftover paper and crimped it with a paper crimper and curled it with a thin marker. I made about 20, and stuffed them in the shoe with pink and white jelly beans. 
Fun easy way to make coordinating  filler for boxes, bags, in this case shoe.

This is my first post and can't wait to do more. I  want to try and not just make cards, this line is so versatile the possibilities are endless.


What I Used:  

OAK Tree Stamps Set- Baby Bumps 
Momento Ink- Tuxedo Black 
Spectrum Noir Markers- FS3, CG1, PP1
Imaginisce- Baby Powder- Queen of the Crib Cardstock 
Paper Crimper 
TomBow Glue 
SVG Cuts.com- Baby Shoe file - Bundles Of Joy Set 
Coastal Bay Jelly Beans 
Dollar Tree- Foam Tape 


Thanks for looking !!!! -Chris 


Wednesday, July 22, 2015

Christmas In July #Cards4Love

Merry Christmas In July!!!!
I am so excited to share this card I created for the Christmas In July #Cards4Love. This is to support St. Jude Children Hospital and The United States Army.  I really hope you all can take part in sending cards. You can win a great prize package just for sending cards. All those details can be found on Crafts By Two's Blog, : http://www.craftsbytwo.com/video-christmas-in-july-cards4love There are a few Bloggers and YouTubers taking part in helping inspire you! You can find all the links at the bottom of this blog post!!!!


AND NOW FOR THE CARD!!!!! 

 I

Used my favorite Cricut cartridge Teddy Bear Parade and cut out the cute Teddy elf. I inked it all up and cut a few scraps to make a card base. 


Here is the finished Teddy Elf  I add pearls to his shoes and hat and also highlight to his nose and eyes. 


Stamped our Merry Christmas on Scraps the  stamp is from Cosmo Cricket's-Jolly Days Collection. 
I cut it out then backed it on a banner I made by cutting triangles out of the edges.  


In th middle of posting my blog half my pictures vanished so here is the finished card... I added washi tape to the edges of the red layer. slapped some fun washi on the bottom to ground the Teddy. I popped everything up on dimensional tape. To add the finishing touches I scattered coordinating sequins. I really hope this makes someones Christmas alot better...
Here is the Address you will need to send the cards to:

Crafts By Two 
Attn:Cards4Love
640 North Greece Road
P.O. Box 182
North Greece, NY 14515-5900
All Submissions must be in by August 31st to be entered in the contest!!! 
Here are the links to check out everyone's great projects! 
George & Ken of Crafts By Two - www.CraftsByTwo.com/Blog 
Melody of Melody Lane Designs - Youtube.com/MelodyLane
MayMay of MayMay Made It - www.youtube.com/maymaymadeit
Lorrie of Lorrie’s Story - lorriesstory.com

Nanny Rose of Crafting on the Dollar -https://www.youtube.com/user/CraftingOnTheDollar
Ken Hess of Ken's Kreations - www.youtube.com/user/hesskr  
Cindy of MiMi's Mixed Bag -www.youtube.com/channel/UCK0VRdBpYhWUmFkw02YMHjw  
Miki of Minis By Mini- www.youtube.com/watch?v=XaTGog86ndA  
Gabrielle of Papercrafting by G - www.papercraftingbyg.com  
Tracey of Gift Basket Appeal - www.youtube.com/user/giftbasketappeal 
Karin of Scrappy DIVA - www.youtube.com/user/homevidka 
Jennifer of Jen’s Little Place -www.youtube.com/channel/UC2f_Yy603Keztxzm6RakDPA 
Kaylin of Krafty Kaylin - kraftykaylin.wordpress.com
YOU ARE HERE: Christopher of Create With Christopher -createwithchristopher.blogspot.com


Thanks for stopping by! I really hope we all inspired you to create some great cards and sent them out for a great cause. -Chris


Saturday, July 4, 2015

Pretty Little Liars-Pocket Letter


CreAted this super Awesome Pocket Letter todAy and just hAd to shAre. 
I know Alot of people don't wAtch the show, And mAy not understAnd. For those of you thAt Are PLL fAns I hope you love it. I hAd the ideA to swAp a PLL Pocket Letters with one of my crAfty friends becAuse she Also loves PLL.     


 I used my Cricut Explore Alot. I creAted A blAck hoodie svg file just for this. I wrApped twine Around A couple of them, for A fun wAy to shAre sAmples. The mini folder notebook wAs Also creAted with my Cricut. It fits perfectly in the pocket.  I print then cut all the A's they came out so cool. The sneAk peAk At the top is my fAvorite cArd.  I just cut out letters from mAgAzines.
The Shh.. cArd, wAs Also fun to make. I got the imAge off Google I reAlly wish I could thAnk the Artist.  I love thAt imAge. It wAs A pAin to fussy cut them All out but so worth  it.  Well that is All I reAlly wAnted to shAre.  If you hAve Any questions on this Pocket Letter or the products I used don't hesitAte to Ask. Sorry, no product list. 

ThAnks For Stopping By, 
          -Chris (A) 

P.S. If you would like the blAck hoodie file pleAse let me know. 

Friday, June 26, 2015

LOVE WINS CARD


Today was a huge day for the LGBT Community. I had to make a card to honor Marriage Equality. 
I just pulled out all the rainbow colors I could find and went to town. I Print then Cut with my Cricut, a couple brides from Oak Tree Stamps Digital Now & Forever Coordinating  Files.  If you would like more details on the card please feel free to ask... 

If you would like to buy the Digital Files or Stamps go to:

Thanks For Stopping By! 
-Chris 


CGCDT Challenge # 269 - Fill in the Blank - .....

The theme for this challenge is:  ~ Fill in the blank -  _____ July ~ (4th, Christmas, vacation, gardening, picnic, etc.)     Our sponsors f...