Showing posts with label Oak Tree Stamps. Show all posts

Thursday, July 21, 2016

I believe in.. OAK TREE STAMPS DT POST


I created this card using 3 Oak Tree Stamps sets. I used Layered Lilacs for the background. I used the sentiments and a couple icons from Believe.  Chibi Girl & Accessories set was used for the head and face. I just used scraps from a previous card and just stamped a fun background, then splatted some FSJ silkes over top.  Used a leftover butterfly and cut it in half to give my fairy wings. The wings started out red, I e-brushed them with a metallic gold sharpie. I also e-brushed the flowers after I created them using random Prima flowers I was given.   I added everything using various adhesives to ensure everything stayed in place. I pulled out my white gel pen and jsut added a lot of fun white highlights to finish the card. I thought it came out fun and whimsical. I hope you like it!!! 

Thanks For Stopping By My Blog
Chris 


Wednesday, July 6, 2016

Thank You Fairy Much Tag - Oak Tree Stamps DT


I created a fun tag using the Fairy Wishes stamp set. I loved playing with my distress inks, they have been neglected lately. I used 2 kraft circle tags and inked them up up with sponge daubers.  After I had all the colors blended I then splattered water on them. it give a fun splatter to the background. I then too some Silks and dripped a few drops on as well. Using a Vintage Photo distress ink I used some of the smaller stamps in the set to add some more interest to the background. I made sure everything was dry and stamped my sentiment and fairy over top in black ink.  Used a white gel pen to add a few pops of high light here and there! I attached a bow with a brad, so the tags will slide easily. 

Here Is What I Used: 

OAK Tree Stamps- Fairy Wishes 
2- 3 1/2 in. Kraft Circle Tags 
Distress Inks: 
Faded Jeans 
Abandoned Coral 
Fossilized Amber 
& Vintage Photo 
Sponge Daubers  
FSJ Silks in Silver Silk 
Momento- Tuxedo Black Ink 
Gelly Roll- White Gel Pen 
FSJ Journey Twine in Neutral
Brown brad (from my stash) 

Thanks For Stopping By!! 

Wednesday, June 15, 2016

BE Inspiring Card- OAK Tree Stamps DT Post

Howdy Acorns!!!  Used the Layered Lilac Stamp Set to create this card... I used various inks I own to create the different layers. I used a white gel pen to add white in the center of the flowers. I love that OAK Tree created these stamps with my crafty friend Melody Lane. I only used 3 of the flower layers but the possibilities are almost endless with different colored inks and layers.  Little secret: I messed up doing the last red flower and didn't want to scrap it.  I just tore my paper to give it a distressed look, and it covered it up nicely. I also got finger prints on the white, tada bling! lol Mistakes are just a chance to embellish or distress. I hope you like my card i was trying to "BE inspiring".


Check Out OAK Tree Stamps for more great stamps and other goodies!!! 

Thanks For Stopping By!!! 
Chris 

Wednesday, May 4, 2016

Grad Card- OAK Tree Stamps DT Post


Goodmorning!!!! I'm just stopping by to share a card using the great digis available through OAK Tree Stamps.  The card layout was found over on fromtheheartstamps.com. I will share the file I created in DS.

What I used:
OAK Tree Stamps- Con-GRAD-ulations Sticker Page
OAK Tree Stamps- P.S. I Love You Paper Pack
Pre-made card base from Micheal's
Fun Stampers Journey- Black Licorice Cardstock
Blue & Green Stones from the Dollar Tree
Various Adhesives
Cricut Explore

Here is the Design Space file for the card layout:
https://us.cricut.com/design/#/canvas/39877430

Thanks for stopping by - Chris

Wednesday, February 3, 2016

PS: I Love You Candy Wrappers -OAK Tree DT Post

I'm so excited to share my first project using the NEW PS: I Love You Sticker Pages and Paper Packs from OAK Tree  Stamps. They are all completely digital so you can use both at different sizes and on different materials. I know most people will use these in journals and planners. I wanted to show that you can use them for more than just that. I got my chocolates from a Valentine's Day tin, I bought just for the artwork. I don't like chocolate, so I wanted to make them cute to give out to co-workers on Valentine's Day.

First Print Then Cut Your images... 
I used the Paper Pack Sheet as a Pattern Fill in Desing Space. 
I printed them on Cardstock so that they would be sturdier. 


 While my machine was cutting I  wrapped my chocolates with a scrap of light purple cardstock.   


I used White Liner(double sided tape) to add the heart. I tucked one end of the twine behind the heart to keep it secure. I twisted the twine and secured the other end with the cute little kissing image, that was popped up on a foam square. 


It was missing something, duh add sparkle with sequins!!! 


They turned out really cute I hope you like them and I can't wait to see what everyone makes with these great new products from OAK Tree Stamps. 


Supplies I Used: 
Cricut Explore 
Random Sequins 
Scotch Foam Squares 


Tuesday, January 19, 2016

Thanks OAK Tree DT Post


Good Afternoon OAK Tree Fans, I just wanted to share a few quick and easy Thanks tags I created.  I made them just to have back ups for cards or any other special thank you gifts I may need.  

All I did was....
1. Cut or buy pre-made kraft colored tags. 
2. Stamp with  your favorite image with Black ink. Would be really cool in white too...
3. Cut out thanks or any one word, in a fun color. Let it hang off the tag it's more fun that way. 
4. Glue on the center letters to your tag. 
5. Add sequins, hearts, stars, any bling really. 
6. Finish off the tags by adding twine that matches your die-cut word.


What I used:  
OAK Tree Stamps -Bear Hugs Stamp Set 
Cricut Explore 
Tag- Ashlyn's Alphabet Cricut Cartridge 
Hello You Thinlets Dies- Stampin' Up! 
Momento-Tuxedo Black Ink
Enamel Hearts- From Tuesday Morning 
Twine From Dollar Tree 
Paper Studio-Kraft Cardstock 
Recollections Colored Cardstock  

Thanks For Stopping By -Chris 


Tuesday, January 5, 2016

Paper Clips- Oak Tree Design Team Project

Hey Oak Tree Fans!!!  I am here to share another easy project using Oak Tree Stamps Digital Files with Print Then Cut on the Cricut Explore.  I am addicted to making paper clips for my planner and I figured I'd show you how quick and easy it really is to make your own.


1. First Print Then Cut your images (2 inches). You can make them whatever size  you'd like just make sure they won't take up your whole paper clip. 
2. Ink the edges. I just like to ink everything!!! (this step is optional) 
3. Cut out 1" circles or smaller depending on your images. 
4. Hot glue your paper clip to the back and add the circle over the glue. Make sure your paper clip is facing the right direction, see the pic below. If you glue both the rounded parts down you won't be able to clip it to your pages. 

DONE!!!!! Can't get much easier than that. The hardest thing is making sure you don't glue the paper clip upside down. They are so cute and you can use them for just about anything you can think of. I use mine for my planners, bookmarks, journals, and Pocket Letters.  

Don't these just look so cute peeking out... 
If you don't have the digital files, you can easily do this with the stamps and color them whatever colors you'd like. 

What I used : 
OAK Tree Stamps-Chibi Boy Expressions Coordinating Digital Files 
OAK Tree Stamps Hello Spring Digital Files 
Dollar Tree Jumbo Paper Clips 
Fun Stampers Journey Cardstock-Whip Cream 
Fun Stampers Journey Cardstock- Black Licorice 
Cricut Explore- Print Then Cut 
Tim Holtz Distress Ink- Black Soot 
Fun Stampers Journey- Punch Handle
Fun Stampers Journey- 1" Circle Punch 
Hot Glue Gun & Glue 

Thanks For Stopping By!!!
 -Christopher

Shop Here: oaktreestamps.com

Tuesday, December 1, 2015

From MEOW To You Card- OAK Tree DT Post

Good evening I made a simple but super cute card for my Design Team project using the OAK Tree Stamps Cat-titude stamp set. Here is my card...

                                .

I cut a piece of yellow cardstock  to 4in.X 5 1/4in.. I stamped several images from the Cat-titude stamp set. I also used a tiny heart from Baby Bumps. I like to use a ink that is a similar color as my cardstock it gives it a great watercolor look.  There is no right or wrong way to do this just stamp the larger images first. Then fill in the small spots with little icon stamps.  I added the stamped paper to a A2  card base and added a little flag I hand cut and stamped my sentiment on. I added little enamel hearts just for a finishing touch.

I hope I inspired you to give this a try, it would be super fun with the Puppy Love or Baby Bumps OAK Tree Stamps sets. Please share pics if you give this a try!

What I Used:
OAK Tree Stamp Sets: Cat-itude & Baby Bumps
Momento Tuxedo Black Ink
Fun Stampers Journey True Color Fusion Ink- Pineapple Smoothie
Recollections Cardstock
Enamel Hearts-(i think i got them at Tuesday Morning)

Thanks For Stopping By -Chris

Monday, November 16, 2015

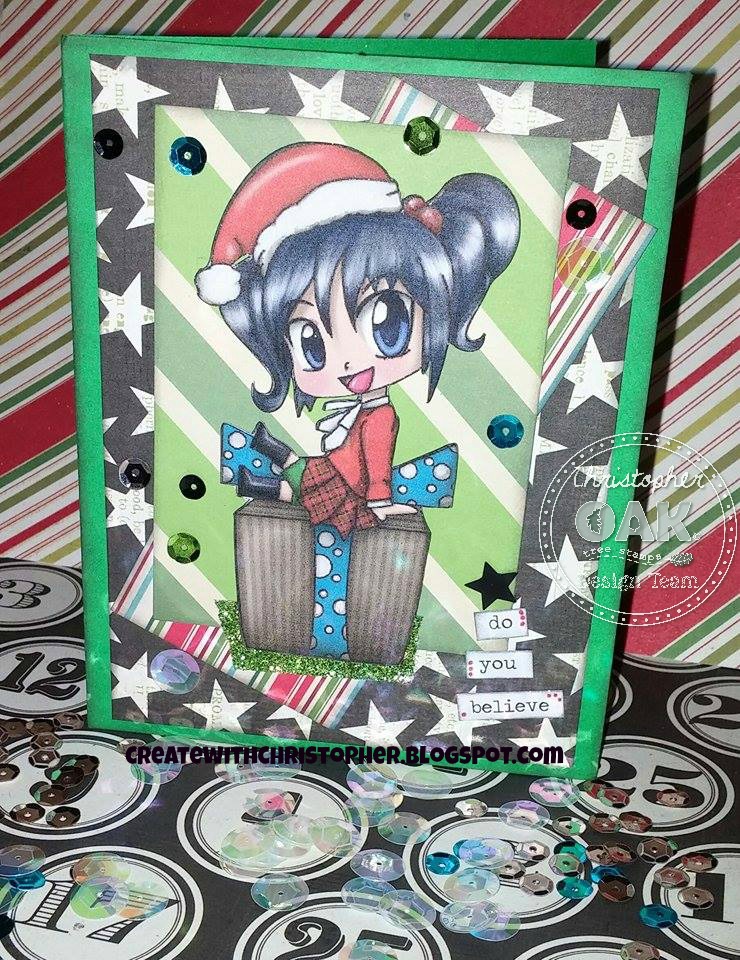
Do You Believe- OAK Tree Stamps DT Post

Hello crafty friends!!!! I know it's not even Thanksgiving yet but, I have another Christmas card to share. I created this card using  the All I Want For Christmas Girl Digital Print Then Cut File form OAK Tree Stamps. This is one of my favorite card sketches. I love it so much because I just grab a card base and cut scraps to fit. After all the pieces are cut I usually ink them all with the same color of ink. This time I used Hickory Smoke(new fav color) Distress Ink. 

I usually glue all the scraps down then pop up the image. Before I added the girl I cut out with my Cricut, I traced all the black lines with a Zig Wink Of Stella pen in Silver. I added a little strip of green litter tape, to ground my image.  On this card I used Tim Holtz-ChitChat Stickers for my sentiment. It looked like a tree so I added a Star Sequin at the top. To finish off the card I added more sequins randomly.  I really hope you like my card and check out the Digital files over at oaktreestamps.com!!!! This PTC image is on sale for just one dollar!!! 

Here is the card: 


                                                  Thanks for stopping by!!! -Chris 

Saturday, October 24, 2015

OAK Tree Stamps Fall Release Party

I'm so excited to be part of the OAK Tree Stamps Fall Release Party!!!! 

Here is the cute candy wrappers I  made to share with friends using the NEW! Cat-titude Stamps Set.


In a few quick steps you too can make these. 

1. Stamp out the any of the cute kitty cats of your choice and the sentiment on patterned paper using a dark ink. Fussy cut the cat and make a banner with the sentiment. 
2. To make the actual wrap, just fold over a  piece of coordinating paper and adhere it on you candy. 
3. I wrapped twine around mine with a little bow just to add a fun touch. 
4. To finish it off add the cut Cat and banner on pop dots. I want a bit further and added a little enamel heart from my stash. 

Product list: 
Snack Sized-Kit Kats 
Paper Scraps 
Momento Tuxedo Black Ink 
Enamel Hearts
Just use what you have and have fun!!!! 

This is a great way to share a little treat with any friend just so they know you care. 

Thank you for stopping by my blog and checking out my project. Please leave a comment and follow and you will be entered to one of the original OAK Tree Stamp set. 

Incase you get lost or just stumbled upon this post, come over to the party!!! 
https://www.facebook.com/events/894714707233171/
Here Are The Sales:
NEW FALL BUNDLE ($33): http://bit.ly/1PNjVge
5 STAMP BUNDLE ($35): http://bit.ly/1NZJSJS
WICKEDLY CUT SET ($9): http://bit.ly/1GykTuo
50% OFF DIGITAL FILES: http://bit.ly/1ONXEPW
NO CODES NEEEDED!!!!
Here Are The Contests:
WIN THE 5 STAMPS BUNDLE:
Randomly selected from the "going" list (event Link above)
WIN A STAMP SET FROM A DESIGN TEAM MEMBER:
Each of my fellow design team members will be posting a project in today's event. Make sure to hop over to their blog to take a peek at their project. To enter all you have to do is follow their blog and comment on the project. Each designer will use random.org to pick their winner

Order your stamps here:

What set(s) will you be getting?! All 3 for me please!!!! 

Tuesday, October 6, 2015

Color Me- Stamped Treat Bags- OAK Tree DT Post


I'm just dropping in to share a fast & fun Design Team Project for OAK Tree Stamps.  How cute is the Wickedly Cute stamps set and I thought, Wow! Everyone would love to color those images.  I made these for my niece and nephew, I'm sure they will get enough candy. 

All you need is some crayons, treat bags and a "Wickedly Cute" stamp set. You can use any images but these are to cute not to use. I  simply stamped the images and sentiments on white card and cut it down to fit the bag. I add the orange to give a flatter coloring surface and also because it pulls in the color of the treat bag.  I used my ATG to adhere all the layers on the bag. Added an 8 pack of crayons and closed them up with a piece of washi tape.  

What I used:  
OAK Tree Stamps-Wickedly Cute Stamps Set (LIMITED QUANTITY AVAILABLE)
Vintage Treat Bags I got at a Local Thrift Store (Any Size will work, just be sure the crayons fit)
Crayola -8 Pk - Pick Your Pack  
Orange and White card Stock 
Momento Black Ink 
ATG

Thanks For 
Stopping By For A Spell
-Chris 


Tuesday, September 22, 2015

Zombie Bride Card


I'm here to share another Design Team project for OAK Tree Stamps. I was feeling a little spooky so I turned the cute bride from the Now & Forever set into a Zombie Bride. This card was fun and super quick to make...

1. I cut the card base using black cardstock, It's cut at 4.75in. X 11.5in. and folded in half. I then cut a few scraps to make some fun layers.
2. I dripped Distress Stain on the white cardstock to make it look like blood spatter. I then added it to the card base with foam tape.
3. Layered the the purple on the black and then tucked a torn and inked piece of red cardstock under them.
4. To add the sentiment, I stamped out "Now & Forever" then dripped more Distress Stain on all over the stamped sentiment. I then just tore it out changing the direction of each little rip.
5. I colored the bride using colored pencils, I just had fun and made her look as creepy,cute and dead as I could. Then fussy cut her out.
6. To finish the card I inked the edges of all the pieces and glued them down. I added the bride and sentiment using foam tape. I then embellished with some enamel hearts.

What I Used:
OAK Tree Stamp Set- Now & Forever
Recollections- Card Stock
Momneto Ink-Tuxedo Black
Tim Holtz Distress Spray Stain- Abandoned Coral
Tim Holtz Distress Ink- Hickory Smoke
WRMK- Enamel Hearts
Crayola Colored Pencils
Cutter Bee Scissors

Thanks For Stopping By!!!!
I hope you enjoyed m cards!!!
-Chris
             

Wednesday, September 9, 2015

Now & Forever Wedding Card- OAK Tree DT Post


I created this card just to have a fun twist on a traditional wedding card. My friend recently had a Neon Wedding so it inspired my card. Keep reading for a quick how to. 

1. I stamped the bride & Now & Forever Sentiment from the Oak Tree Stamp Set-Now and Forever on regular white cardstock. I fussy cut them out and I colored the bride with colored pencils. 

2. I layered the fussy cut images on a piece of coordinating cardstock and also cut fussy cut around them for a fun border and to make them pop.   

3. This is my favorite card layout because it's so easy. I always just use scraps and chop them to fit to my liking. After all my layers are adhered to my pre-made card base I add my image and sentiment using adhesive foam tape. 

4. To finish the card I added some layered sequins. I added pearls in the black ones and tiny rhinestones on the others to cover the tiny holes in the sequins. 

This was such a fun card to make I hope you all enjoy it and give this card layout a try. 

What I used:
OAK Tree Stamp Set-Now and Forever
Pre-made card base 
Sequins 
Pearls 
DCWV-The Chalk Fun Stack 
Momento Ink-Tuxedo Black 
White Cardstock
Paper Trimmer 

Tuesday, August 18, 2015

Small Things Tag- OAK Tree Stamps- Design Team Post


I have a friend who is expecting and I just wanted to give her a tiny something. I didn't have a small enough gift bag, so I made one. It was very plain so I created a tag to go on the front of it. I had the idea that I wanted to have my stamped image match the papers but wasn't sure how to do that. Here is what I came up with. 


1.  I cut out a piece of the lightest part of the paper I could find it was hard because there where flowers everywhere. I then stamped an image from the OAK Tree-Baby Bumps Stamp set. 
2.  I colored her in using my Spectrum Noir Markers. I love how it turned out. 
3. Cut her out leaving a tiny border


4.  I cut out flowers from the paper, and used the same Spectrum Noirs to add a bit more color and pull it all together. I also cut out a small banner and stamped the "Good things come in small packages" sentiment.  

 5. I cut out the tag at 4 1/2in X 3in. and distressed it a bit.  I used a Tim Holtz Distress tool on the edges, then inked it with Black Soot Distress Ink. I wrinkled it a bit and added a few splashes of Perfect Pearl Mists. I cropped the edges and rounded the bottom. I also punched a small hole with my crop-a-dile. 
6. I adhered all the pieces to the tag. I popped a few of them up on dimensional tape.  
7. To finish off the tag I added a a few yellow rhinestones to the flowers. I ran tulle thru the whole and stapled it to make sure it stayed in place. 

I added all the tag to the front of the bag with dimensional tape and used the same tulle to stuff in the bag. I really love how it all came out.

What I used:
OAK Tree Stamp Set-Baby Bumps 
Fancy Pants Papers- Item #758 In Love  & Item #862 Fairytale
Spectrum Noir Markers 
Tim Holtz Distress Tool 
Black Soot- Distress Ink 
Perfect Pearls Mist- Turquoise & Interference Red
Yellow Rhinestones
Turquoise Tulle
Crop-A-Dile 
Dimensional Foam Tape 

Thanks for looking, hope this inspired you to pull out your stamps and create!!!! 
-Chris  

Tuesday, August 4, 2015

Baby Bumps Shoe~OAK Tree Stamps

Created For OAK Tree Stamps- Design Team


I'm excited to share my first project for OAK Tree Stamps. I really wanted to make a card but figured why not try a Baby Shower party favor. The Baby Bumps Set had my head filled with thousands of ideas. 

How I Created The Shoe:

1.  I made the shoe with a file from SVGcuts.com's set Bundle Of Joy, cut with my Cricut Explore. It's only four pieces and goes together very easily. I added a button brad to the top strap, for a nice finished touch. 

2.  After stamping the baby from the Baby Bumps Set, onto  Stampin' Up!-Whisper White Cardstock,  I colored her in with 3 Spectrum Noir Markers( See photo or Supply list for colors). 
If you lay on several layers you get different colors from one marker, Oak Tree Offers a great coordinating SVG file for all their stamps.  I didn't use it I fussy cut my image because I need it a bit smaller.  


3. Using Foam Tape I adhered the baby and Welcome! flag on the top of the shoe. 

4.  To finish it all of, I used leftover paper and crimped it with a paper crimper and curled it with a thin marker. I made about 20, and stuffed them in the shoe with pink and white jelly beans. 
Fun easy way to make coordinating  filler for boxes, bags, in this case shoe.

This is my first post and can't wait to do more. I  want to try and not just make cards, this line is so versatile the possibilities are endless.


What I Used:  

OAK Tree Stamps Set- Baby Bumps 
Momento Ink- Tuxedo Black 
Spectrum Noir Markers- FS3, CG1, PP1
Imaginisce- Baby Powder- Queen of the Crib Cardstock 
Paper Crimper 
TomBow Glue 
SVG Cuts.com- Baby Shoe file - Bundles Of Joy Set 
Coastal Bay Jelly Beans 
Dollar Tree- Foam Tape 


Thanks for looking !!!! -Chris 


Friday, June 26, 2015

LOVE WINS CARD


Today was a huge day for the LGBT Community. I had to make a card to honor Marriage Equality. 
I just pulled out all the rainbow colors I could find and went to town. I Print then Cut with my Cricut, a couple brides from Oak Tree Stamps Digital Now & Forever Coordinating  Files.  If you would like more details on the card please feel free to ask... 

If you would like to buy the Digital Files or Stamps go to:

Thanks For Stopping By! 
-Chris 


CGCDT Challenge # 269 - Fill in the Blank - .....

The theme for this challenge is:  ~ Fill in the blank -  _____ July ~ (4th, Christmas, vacation, gardening, picnic, etc.)     Our sponsors f...