Showing posts with label Cricut Design Space. Show all posts

Wednesday, May 4, 2016

Grad Card- OAK Tree Stamps DT Post


Goodmorning!!!! I'm just stopping by to share a card using the great digis available through OAK Tree Stamps.  The card layout was found over on fromtheheartstamps.com. I will share the file I created in DS.

What I used:
OAK Tree Stamps- Con-GRAD-ulations Sticker Page
OAK Tree Stamps- P.S. I Love You Paper Pack
Pre-made card base from Micheal's
Fun Stampers Journey- Black Licorice Cardstock
Blue & Green Stones from the Dollar Tree
Various Adhesives
Cricut Explore

Here is the Design Space file for the card layout:
https://us.cricut.com/design/#/canvas/39877430

Thanks for stopping by - Chris

Thursday, November 26, 2015

Happy Thanksgiving!!!!

I just wanted to drop in to wish you all a Happy Thanksgiving and share a Design Space File for this cute Cricut Turkey....

The only thing you have to do is add a dark brown scrap behind the eyes unless you want to be the color of  your Cricut. I also colored the eyes on the turkey head darker brown, with a Spectrum Noir Marker EB7. To add the white accents I used a Gelly Roll Pen. All the Papers are Recollections.  

Enjoy Your Thanksgiving 
-Chris  

Monday, November 9, 2015

Never Ending ATC


I was watching YouTube on how to make different types of cards. I came across a video called  Never Ending Cards and it was so cool(link Below). I thought I bet I could make that. Guess what it's really easy!!!! I made a short video to share mine(sorry not the best quality). I made a File for Design Space so I can make the bases faster. These are great for ATC Swaps, Pocket Letters, Just Because gift for a friend... 

If you need help getting your together don't be afraid to ask!!! FYI-The second flip will not meet up in the center because the size I made it.  


What I used for this Never Ending ATC:
Scrap Card Stock
Tim Holtz- Lost and Found Stamp Set 
Black Soot Distress Ink 
Craftwell eBrush 
Spectrum Noir Markers- TB4, DR6, TB8 
Cricut Explore W/Score tool 
Hampton Art Stamp Set- By Stencil 1 
Wink Of Stella-Silver 
FSJ-True Color Fusion Ink- Black Licorice 

Song Credit: Gwen Stefani-Used To Love You 

Inspiration Came from this Video: 

Cricut Design Space File: 

Thanks so much for stopping by!!! -Chris 


Double Accordion- Gate Fold X-mas Card


Just popping in to share this Christmas card I created this morning. If you have a Cricut Explore you can click the link below to make your own. They are very easy to make with out a Cricut too!!!! Simply cut a 12X12 sheet of paper in half so it's 6X12. Then on the long side score at 2" 4" 8" & 10"then accordion fold it.  If you have any other questions don't hesitate to ask.

Cricut Design Space File:
https://us.cricut.com/design/#/canvas/33074965

Thanks for Stopping By!! -Chris

Wednesday, August 5, 2015

OITNB Pocket Letter & ID Badge

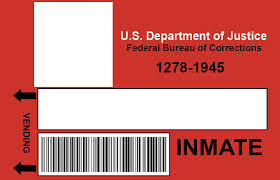
I recently did an Orange Is the New Black themed Pocket Letter swap with my Facebook BFF Jennifer Laging. I had so much fun creating all the cards and adding the extra goodies. I used my Cricut Explore to create the ID badge and I knew everyone would want to know how it was done. It was very easy to do.  Keep reading to see how....


Upload the above image into Cricut Design Space, with a square photo of your favorite inmate. Make sure you do a Basic Upload, and click complex image. Insert both images into a new project. Resize the square photo of your inmate to fit in the square on the badge. Then using a simple font add your inmates name. If you want it like the show, do it like I did Jen's.  Once you have everything sized and in it's spot select everything and click Attach. I always check to make sure everything is going to Print Then Cut and not just Cut, to check this there will be a printer icon next to your images and text.  Once you've got everything ready to go you can size it to fit in a Pocket Letter, or how fun would these be for a OITNB Viewing Party. If you need more instruction or help please feel free to let me know via FB or in the comments. 


   Jennifer told me she loved all the inmates but her favs are Red and Crazy Eyes, which is why I used them on the front. I know you can't see it but on the back Crazy Eyes Pocket I put a I'd Throw my Pie For You sign, and filled the pocket with die cute dandelions and chocolate and vanilla swirl die cuts.  In the Red pocket I added her Chicken Quote and a bunch of die cute orange chickens. Yes! I did buy Top Ramen, just to steal the flavor packets lol... They fit and tied in so well with the theme. The other goodies don't really tie in with the theme I just used them to stay with the color scheme and send Jen some other crafty goodies.

Thanks for stopping by my blog please click Follow and Leave a Comment...  -Chris


FUN LINKS!!!!

What is a Pocket Letter? How it got started:
 https://www.youtube.com/watch?v=OxHLkm0lZi0

OITNB- Opening Credits-You've Got Time
https://youtu.be/fBITGyJynfA

OITNB- Red's Chicken Quote
https://youtu.be/LNwDcr2qP4M


Friday, November 21, 2014

Sprayed Bleach Shirt


Everyone(including Ashish) loved my shirt I made for the Meet  & Greet with Ashish Arora,CEO of Cricut in Nashville, TN. I wanted to share how I made it, it's really easy!!!
 It's an old technique, but quick easy and cheap!!!  


************************************
Here is what you need:

Cricut Machine (any one) 
Bleach 
Spray Bottle 
Vinyl or Contact Paper

***********************************


Step 1: If you're using a new T-shirt wash it before you do this technique. 

Step 2: Once its cleaned an dried, Put your T-shirt on a flat surface so you can easily put your image on. 


Step 3: While your shirt is washing, find an image and design your t-shirt. Once its all designed and you love it, Cut it out. 
You can use vinyl or contact paper.  
Tip: In Design Space you can change the canvas and shirt sizes, So, you know just how big you need your image. 


Step 4: Add your cut out image to the t-shirt. Make sure you press it down good. It's okay if you don't get it all the way, The bleach will just bleed and I personally think it adds to the effect. 


 Step 5: Pour some Bleach in a spray bottle.  
Caution: Don't get it on your other cloths!!!

Step 6; Now the fun part!!!! Spray over the design. 
The messier the better. For fun spray the sleeves and other random spots too. If you let it sit a minute and add a few more random sprays it will add a different color. 


Step 7: When you have your desired look, place a paper towel over the image to absorb any excess bleach. 


Step 8: Remove the Vinyl(contact paper). 


Step 9: To get rid of the bleach smell, hand rinse with cold water. 


Step 10: WASH IT AGAIN!!!! Wash it with cold water, this will help it from bleeding and get rid of the bleach smell. 
If you do several all the same color you could wash them at the same time... 


Tada!!!! I love this technique. It would also be fun to get a white shirt and spray colored dye on it!!! OMG, I'm going to TRY IT!!! 

I would love to see what you make using this technique.

Please Join Us In The Pioneer Cricuteer on FB &
SUBSCRIBE FOR MORE FUN IDEAS!!! 

THANKS FOR STOPPING BY -Chris 

Monday, November 17, 2014

Cricut Guy & Design Space Link


I will be showing you how I put together this Cricut Guy after I made him in Cricut Design Space and cut him from my Cricut Explore.  I used the images from Teddy Bear Parade and Store Front Cartridges(both are in the subscription, to create this fun little guy. I will share the Cricut Design Space Link at the bottom of this post. 

This is the Finished Cut!!! 


Simply cut out the pieces... There is only 3 colors so its very easy. 
(excuse the dirty mat)


I then punched out a circle and just cut it into pieces to back my eyes and mouth. 


I use 2 Way Glue to adhere them.
(any glue will work) 
Tip: Make sure your pieces cover the holes before you adhere them.


I added Stampin'Dimensionals on the eyes so they would pop.Add his shirt,and your done! 


I hope you all enjoy this cute little Cricut Guy.

Here is the Design Space Link:

All you have to do is click the link it will open up in your Cricut Design Space Account. 
You can cut him free if you have the subscription. 
The images I used where from Store Front &  Teddy Bear Parade, so if you have both it will be free. If you have just one of the 2 you will have to only pay $0.99 and you will own it to cut when ever you like.  Please feel free to comment, share & ask any questions.

p.s. If you have Teddy Bear Parade you can use all the outfits on the 
Cricut Guy how fun would that be!!! 


CGCDT Challenge # 269 - Fill in the Blank - .....

The theme for this challenge is:  ~ Fill in the blank -  _____ July ~ (4th, Christmas, vacation, gardening, picnic, etc.)     Our sponsors f...