Thursday, December 31, 2015

Happy New Year & Fun Stampers Journey Promos

First I'd like to wish you all a Happy New Year!!! I hope to be more active in my blog with GIVEAWAYS and Projects!!!! I am going to be doing a lot of Glam Planning and hopefully get back into mini albums and junk journals.  Now for FSJ news!!!!

You can join my team and start your own Journey!!!! FOR JUST $99.00 + tax and shipping!!!
More info on my website: http://www.funstampersjourney.com/become-a-coach
THIS IS AN AMAZING KIT & PRICE!!!! If it's not for you maybe you know someone who would love the opportunity!!!! It's great for Hobby Crafters also because the quarterly minimum is only $150 and you don't have to do it all in one order!!!!

Here is what is in the Kit:


Also from FSJ.... You can now order form the Spring Catalog!!!!  I am so excited about the Planners and all the new stamps!!!! EEEK!!!!  Here is the link to the catalog:  SPRING CATALOG
You can also just go directly to the my website and hit Shop!!! You will find all the goodies under there too!!!

Again Happy New Year and Journey On!!!
-Chris

Monday, December 7, 2015

Heart Background Card- Brutus|Monroe DT Post

Happy Monday!!!! I'm so excited to share first this month...  I know a lot of us have our Christmas cards done so why not start on Valentine's Day cards. I was inspired to make this card By Jennifer Mcguire of Jennifer McGuire Ink on YouTube. I'll share the link to the video/channel at the end of this post.

I used 3 different heart stamps, the large one is from the Many Thanks stamp set and the two smaller ones are from Serena Bee's Deadly Desserts stamp set. I used 3 different stamp blocks to make it easier, but if you just have one or two it's easy to swap the stamps.

Cut a piece of white cardstock to 4 X 5.25 inches, and start stamping. I used 5 Brutus|Monroe Premium Chalk Inks. I started with Wagon, there is no right or wrong way to do this just stamp randomly and have fun.
 Just keep going changing colors until you reached the bottom. If you mess up don't worry you can cover it with your sentiment, twine, or bling. Or, just trim it down like I did.  (tip:don't stamp the images in a straight line, let the different colored stamped images mix and blend)

I used a 3.25 X 4.5in die to cut out my background. I inked the edges with Black Soot Distress ink, and added it to a black card base.  

To finish off the card I added a sentiment from Love You Moon, and backed it with piece of black cardstock. I also added black rhinestones. Here is my finished card, I really hope you like it. 


Products I Used: 
Love you Moon 
Many Thanks 
Deadly Desserts 
Wagon 
Jack-o-lantern 
Phonebook
Jurassic
Oz 
Fun Stampers Journey Cardstock
Momento Tuxedo Black Ink 
Distress Ink-Black Soot 
Black Rhinestones

Here are the links to the YouTube channel and video:  

Thanks For Stopping By - Chris 

Tuesday, December 1, 2015

From MEOW To You Card- OAK Tree DT Post

Good evening I made a simple but super cute card for my Design Team project using the OAK Tree Stamps Cat-titude stamp set. Here is my card...

                                .

I cut a piece of yellow cardstock  to 4in.X 5 1/4in.. I stamped several images from the Cat-titude stamp set. I also used a tiny heart from Baby Bumps. I like to use a ink that is a similar color as my cardstock it gives it a great watercolor look.  There is no right or wrong way to do this just stamp the larger images first. Then fill in the small spots with little icon stamps.  I added the stamped paper to a A2  card base and added a little flag I hand cut and stamped my sentiment on. I added little enamel hearts just for a finishing touch.

I hope I inspired you to give this a try, it would be super fun with the Puppy Love or Baby Bumps OAK Tree Stamps sets. Please share pics if you give this a try!

What I Used:
OAK Tree Stamp Sets: Cat-itude & Baby Bumps
Momento Tuxedo Black Ink
Fun Stampers Journey True Color Fusion Ink- Pineapple Smoothie
Recollections Cardstock
Enamel Hearts-(i think i got them at Tuesday Morning)

Thanks For Stopping By -Chris

Thursday, November 26, 2015

Happy Thanksgiving!!!!

I just wanted to drop in to wish you all a Happy Thanksgiving and share a Design Space File for this cute Cricut Turkey....

The only thing you have to do is add a dark brown scrap behind the eyes unless you want to be the color of  your Cricut. I also colored the eyes on the turkey head darker brown, with a Spectrum Noir Marker EB7. To add the white accents I used a Gelly Roll Pen. All the Papers are Recollections.  

Enjoy Your Thanksgiving 
-Chris  

Thursday, November 19, 2015

Just BEEcasue- Maymay Made It! DT Project


I am very excited to share this Pinterest inspired card I created for my Maymay Made It design team project.  I made this fun Beehive shaped card. The Bee's Knees stamp set was so fun to play with.


Here is a quick how to:

1. Cut out all your pieces and ink them all up. Here is the Design Space file all sized and ready to go for you.  https://us.cricut.com/design/#/canvas/33407619  Optional : Stamp on a face with stamps or just use the bee as is. This bee would look super cute with facial features from Mamay's Happy Tree Set.  I used a Scrappy Dew stamp for this one.


2. Glue all the pieces where they go to make the card, just glue the hearts at the top closed. 
3. Using a gel pen I added a few more highlights to my bee and hive. 
4. I found the placement I wanted for for my bee and stamped the little trail from the set. I then stamped out "Just BEEcause". 
5. I popped up the bee on foam squares. Added a bow, and flowers just because I wanted more blue.
6. Inside of the card I wanted to use the honeycomb stamp. I had the square cut out and just simply stamped over it with a similar color of the paper. Use the same ink you use to ink the edges, unless its Distress Ink because it doesn't stamp well with photopolymer stamps.  Then I just stamped the sentiment "Hive been thinking of you!" in Momento Tuxedo Black. Then just glued it in. 


Here is the completed card, I hope you all like it. Most important I hope I have inspired you to pull out or buy this amazing stamp set!!!!  


What I used: 
Maymay Made It Stamp Set -The Bee's Knees 
Stampin' Write Marker- Pumpkin Pie 
Tim Holtz Distress Ink- Faded Jeans 
Fun Stampers Journey- True Color Fusion Ink- Pineapple Smoothie 
Prima  Flowers 
Blue Blings from my stach 
White Gelly Roll Pen 
Reccolections Papers 
Colorok- Midnight Black Textured Cardstock 
K&Co.-Itsy Bitsy 8.5X8.5 Paper Pad 
Black Nylon Ribbon 
Momento- Tuxedo Black Ink 
Cricut Explore 
Create A Critter Cricut Cartridge  


ALL ABOUT MAYMAY MADE IT & FALL/WINTER DT:

1. Maymay Made It stamps were created in 2013.
2. They are manufactured from high quality photopolymer right here in the USA.

3. 4x6 stamp sets (or what I call full size) are $11.99.
4. 4x4 stamp sets are $7.99.
5. Maymay Made It offers a stamp club. It is $11.99 per month USA and $13.49 per month international, there is not shipping charge and as long as you are a club member in good standing you can take advantage of free shipping on all stamps ordered from the Etsy store. 
Maymay Links:
Get Maymay Made It Stamps here:
https://goo.gl/924Kwq
Maymay Made It Youtube:
http://goo.gl/EPxIBl
Maymay Made It and So Did I Facebook Group
http://goo.gl/EPxIBl

Maymay Made It Fall/Winter Design Team:
Tracey Phillips
https://goo.gl/OQ6bp0
Gareth Frewer
https://goo.gl/iuQewu
Christopher Lopez
http://goo.gl/ZemXd2
Stacy Williams
https://goo.gl/N7YUrg

Thanks again for stopping by!!! -Chris

Tuesday, November 17, 2015

Joy Ornament- B|M Design Team Post

I'm back with another Christmas project. I have wanted to try making Christmas Ornaments. When I saw the Holiday Digital Set from Brutus|Monroe I knew I had to try it with these images.

Here is a quick how to:

1. Upload the Digital Stamp in to Cricut Design Space. Cut out the image in vinyl.
2. Weed the image and place it on a clean ornament. I used rubbing alcohol to clean the surface of mine. You should end up with something like this.
3. Pop the top off and add in whatever you'd like. I added sequins in mine. But you could add sand, fake snow, glitter, anything that fits really!!!! I used Stars, Reindeer, and different sized Sequin cups. I added black stars and sequins after because I found a black nylon ribbon I wanted to use. 


4. For the finishing touches, I added a black bling in the middle of the snowflake, and then added a few random sequin. I tied a bow and added it to the top with an extra piece of ribbon to hand it from my tree. 

Here is my finished ornament, I hope you like it and I hope you go check out Brutus|Monroe's Holiday Digital set and give this a try it was really fun. 


What I Used: 
Brutus|Monroe Holiday Digital Set
4" Clear Glass Ornament
Black Nylon Ribbon 
Oracal 651- White Vinyl 


Monday, November 16, 2015

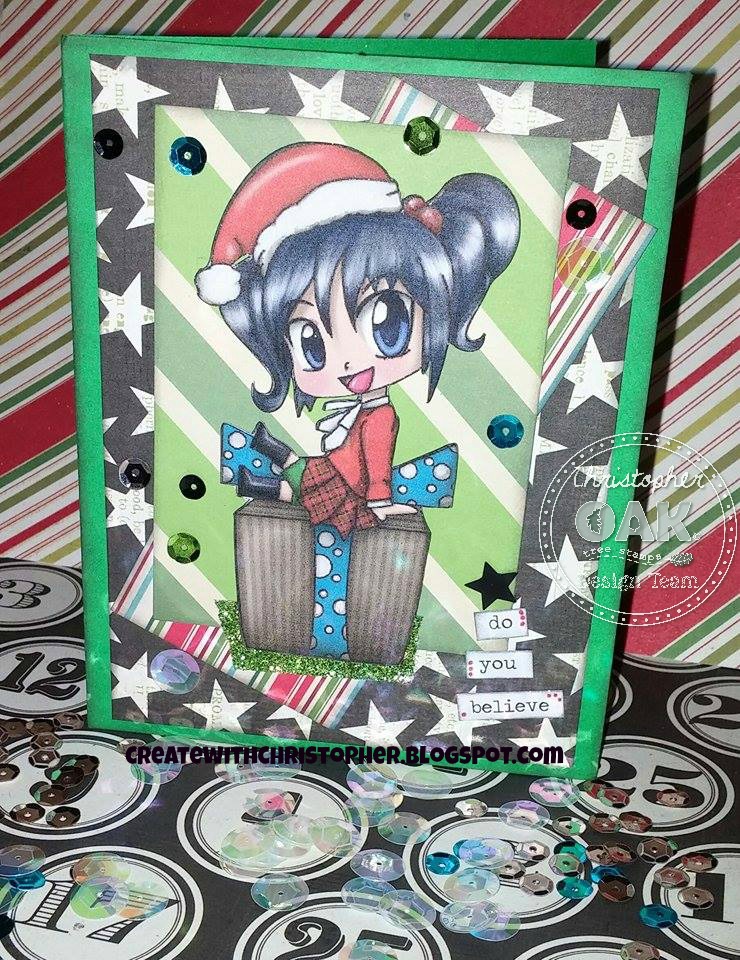
Do You Believe- OAK Tree Stamps DT Post

Hello crafty friends!!!! I know it's not even Thanksgiving yet but, I have another Christmas card to share. I created this card using  the All I Want For Christmas Girl Digital Print Then Cut File form OAK Tree Stamps. This is one of my favorite card sketches. I love it so much because I just grab a card base and cut scraps to fit. After all the pieces are cut I usually ink them all with the same color of ink. This time I used Hickory Smoke(new fav color) Distress Ink. 

I usually glue all the scraps down then pop up the image. Before I added the girl I cut out with my Cricut, I traced all the black lines with a Zig Wink Of Stella pen in Silver. I added a little strip of green litter tape, to ground my image.  On this card I used Tim Holtz-ChitChat Stickers for my sentiment. It looked like a tree so I added a Star Sequin at the top. To finish off the card I added more sequins randomly.  I really hope you like my card and check out the Digital files over at oaktreestamps.com!!!! This PTC image is on sale for just one dollar!!! 

Here is the card: 


                                                  Thanks for stopping by!!! -Chris 

CGCDT Challenge # 269 - Fill in the Blank - .....

The theme for this challenge is:  ~ Fill in the blank -  _____ July ~ (4th, Christmas, vacation, gardening, picnic, etc.)     Our sponsors f...